WATER COOLER IS TRIPPING THE POWER
| WATER COOLER IS TRIPPING THE POWER FEB 2020 |
Causes:
1. The water tank has overflown (electronics got wet)
2. Motherboard is damaged
3. Kettle – Hot Pot has burned out
4. Fuse needs replacing
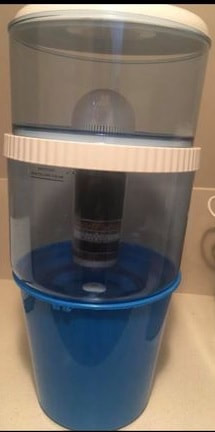
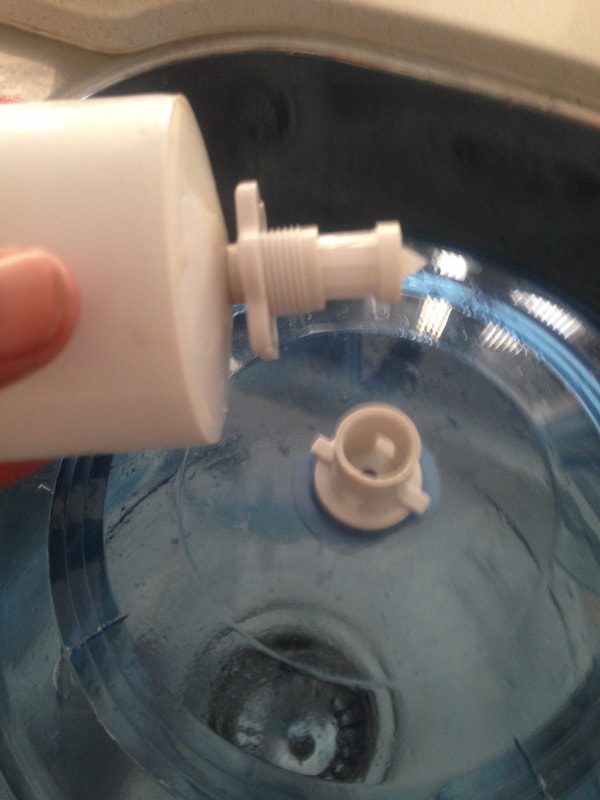
REMOVED BOTTLE SET OF WATER COOLER PUSH UP FLOAT VALVE TO STOP THE FLOW OF WATER WHILST MOVING EASIER
Remove bottle set of water cooler.
|
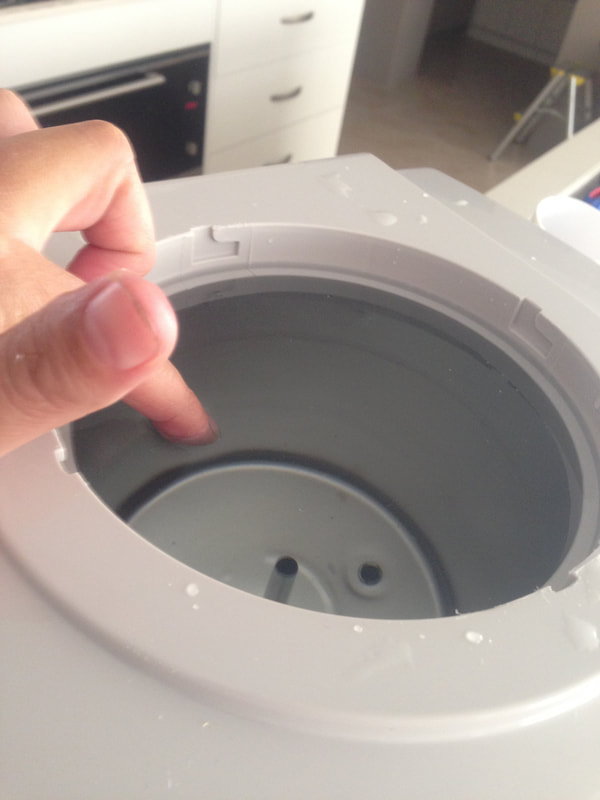
INSIDE COLD TANK NEEDS TO BE ABOUT 2 - 3 INCHES DOWN FOR CORRECT OPERATIONS OF THE FLOAT VALVE
Check level of water
inside tank. Should look 2 – 3 inches down |
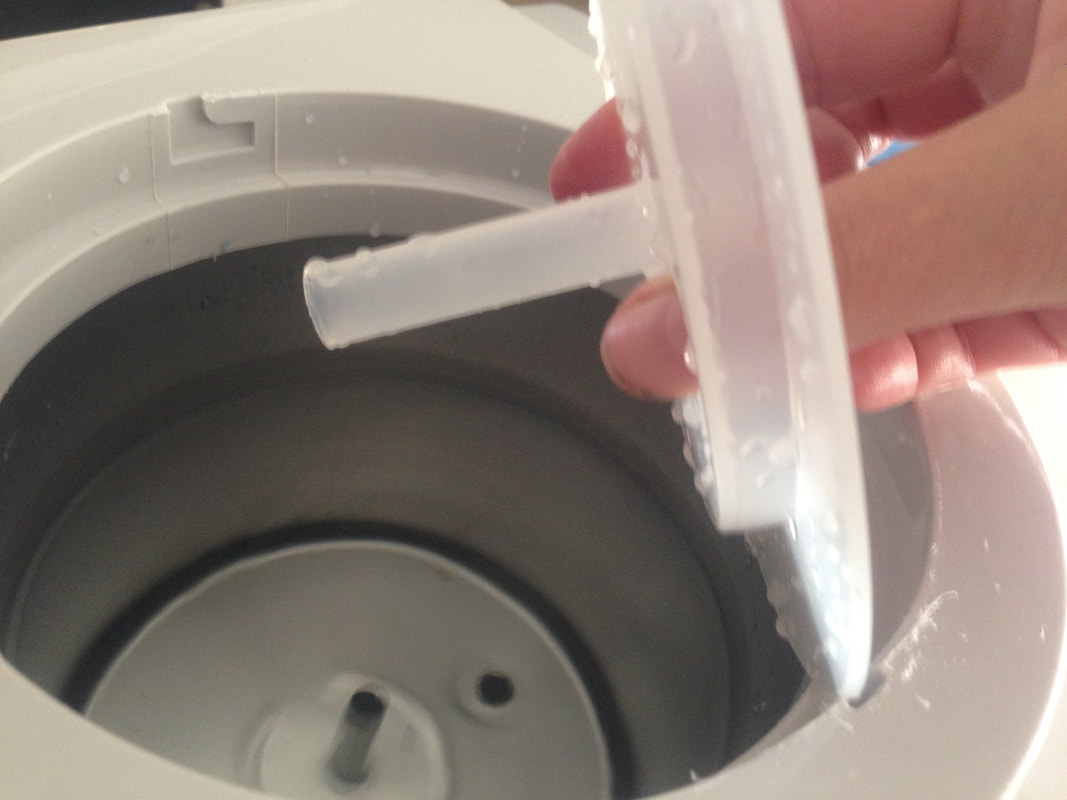
WATER TOO HIGH FLOAT VALUE HAS LOCKED NEEDS CLEANING
IF higher float valve
not working |
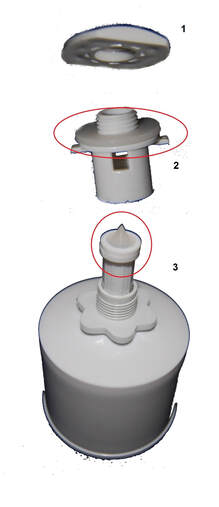
NEW FLOAT VALVE WHITE BPA FREE PULL APART AND CLEAN THOROUGHLY SMALL FINE PARTICLES OF CARBON ON THREAD, NIPPLE CLEAN WITH A SOFT TOOTHBRUSH
|
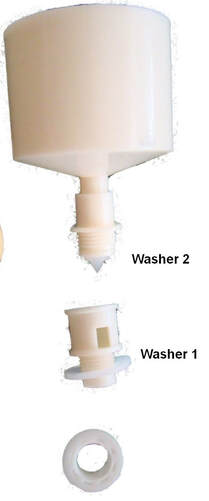
OLDER FLOAT VALVE BEIGE PULL APART AND CLEAN THOROUGHLY SMALL FINE PARTICLES OF CARBON ON THREAD, NIPPLE CLEAN WITH A SOFT TOOTHBRUSH
|
Electronics got wet due to tank overflowing Empty tank via taps, till emptied
Unscrew float valve (upside down cup) bottom of bottle set
(older beige in colour) (new BPA FREE white in colour)
Empty water cooler of all its water
All a day to dry all electrical components
Clean all bottle set parts thoroughly
Make sure float value is secular tightened
Add all washers to their correct positions.
Assemble water cooler
Leave turned off till water has filtered through.
No lights should be on the digital screen (RED OR BLUE)
Check to make sure water can be dispenser from hot tap before turning ON
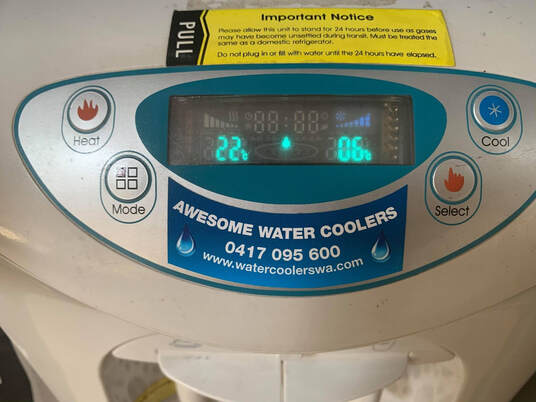
Turn cold water on first, by pushing the BLUE Cool button only once.
The blue snowflake & blue triangle grid will come on.
Wait about 3 minutes to see if compressor kicks in, listen for a fridge like noise
If the power trips when turning on
either the motherboard needs replacing
OR
The compressor has died.
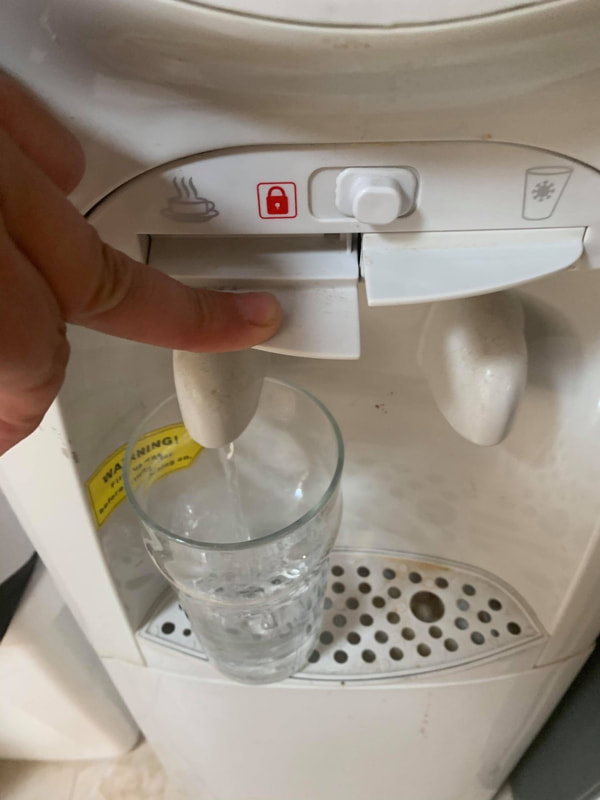
ALWAYS MAKE SURE HOT WATER IS DISPENSING VIA HOT TAP BEFORE TURNING ON THE HOT SIDE
Check to make sure water
is coming from the HOT TAP. |

HOT SIDE ON WITH RED STEAM & RED TRIANGLE GRID IS LITE UP IN RED
IF NOT
wait another 10 minutes once water is running freely you can turn on the HOT side, by pushing the RED Heat button top left. They should be a red triangle grid with red flames Wait 5 minutes for the hot water to start heating IF the power trips when turning on the hot, it could be either the hot relay button located on the motherboard that is damaged, OR Kettle – hot pot element that has burned out. |
UNSCREW 2 X SCREWS LOCATED AT THE BACK OF WATER COOLER ON THE LID
Turn off water cooler power & unplug
Unscrew 2 x screws at back Remove lid wiggle off to loosen |
LEAVE WIRES IT TAKE ALLOW THE LID TO JUST HANG TO THE SIDE WHILST REPAIRING WATER COOLER
Remove Lid
Leave wires stay intact. Undo metal box Remove 2 x screws via back of water coolers IF no box < 2006 model (rare parts) |
If none via front, undo the motherboard from the casing and check back of motherboard
It is possible hot got damaged, but cold is still working.
Check for signs of damage, if so needs to be replaced.
IF motherboard is OK, then it is most likely the kettle – hot pot has burn out.
The kettle – Hot pot needs replacing.
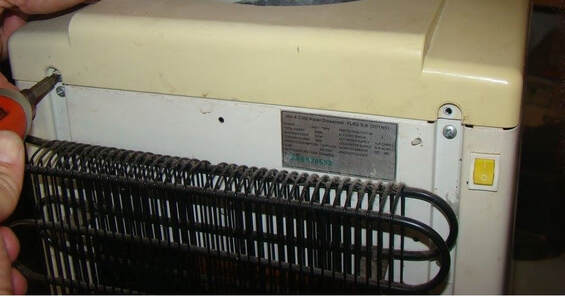
Located via back of machine
Open the fusing casing with flat nose screwdriver pushing in & turning anti-clockwise
Check if fuse is damaged
Replace with 10A –250v Fuse
IF no fuse casing via back of water cooler < 2006 model and repair not rec
MOTHERBOARD + ALK STICK
OPTIONAL EXTRA FILTERS (1 = $50) (2 = $80) (3 = $110) (4 = $130)
WATER COOLER “NOT COOLING”
COULD BE 1 OFF 3 THINGS LISTED BELOW
1. COMPRESSOR SWITCH
2. MOTHERBOARD
3. DIDIBOARD
PRICES VARY DUE TO ADDING EXTRA FILTERS
RECOMMENDED FILTER CHANGE EVERY 6 MONTHS
THE MORE YOU BUY THE MORE YOU SAVE FREE POSTAGE
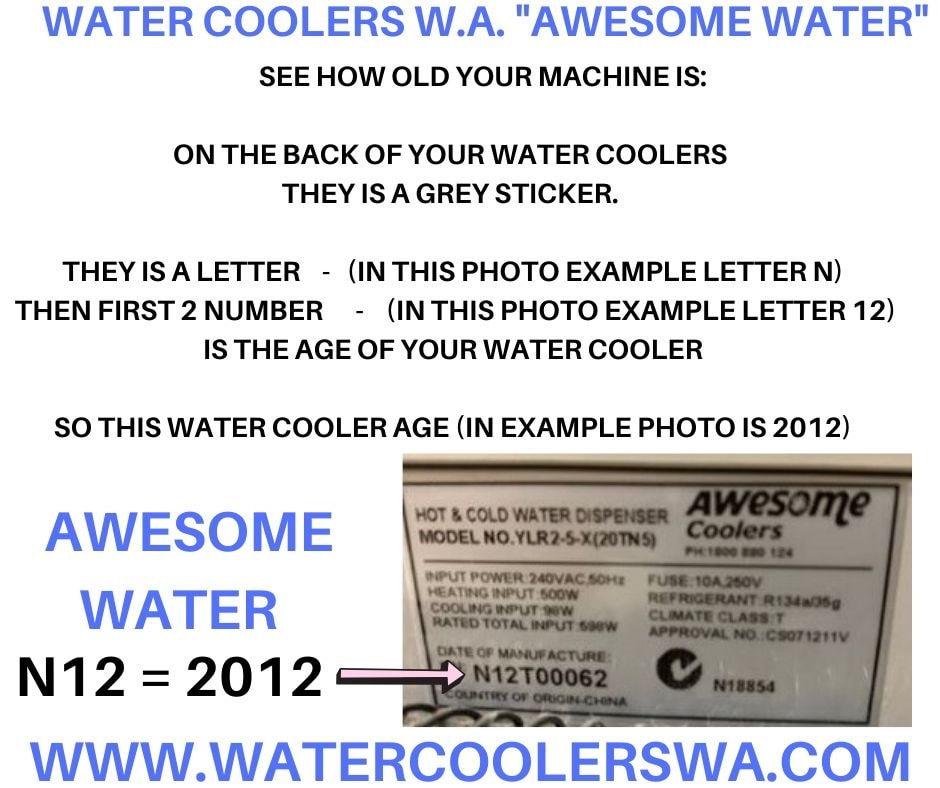
1. SEE HOW OLD YOUR MACHINE IS
On the back of your water coolers they is a grey sticker. The numbers are green the first 2 number are the year the water cooler was purchased
If older than 2006 – spare parts are rare...
Check list
Check if compressor kick’s in
Turn off your machine for more than 3 minutes, then turn back of with the cool snowflake BLUE button, listen for the compressor to kick in they will be a slight noise like a fridge turning on, can take up to 2-3 minutes your screen should have BLUE triangle grid with a small blue snowflake in the left corner of grid, just above the temperature display panel. You can also place your hand against the right side where the compressor is and you can feel compressor starting.
IF you do not hear a clicking noise the compressor clicking in, then this needs to be replaced
If digital display had faded due to sunlight you can use your hand to cup shade to see screen
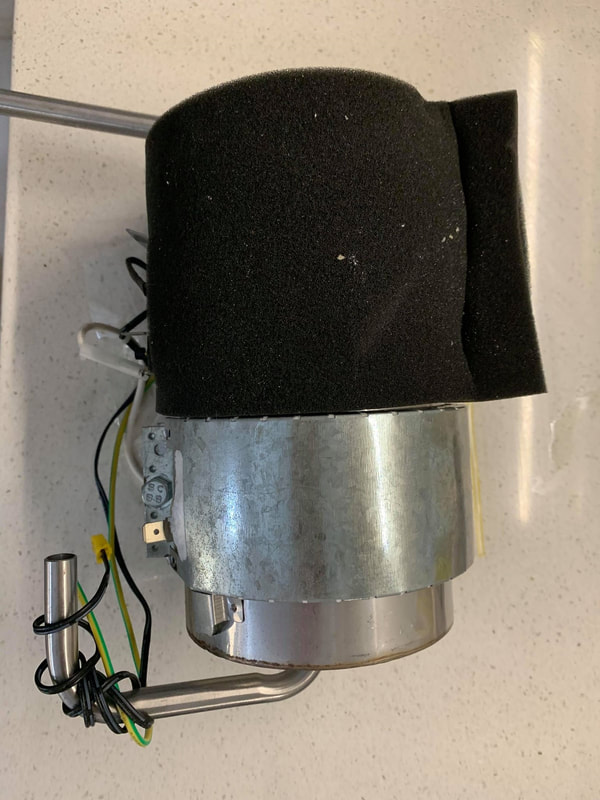
1.COMPRESSOR SWITCH
This is located at the back of the water cooler, behind the grilled bars. USE a torch to see easier.
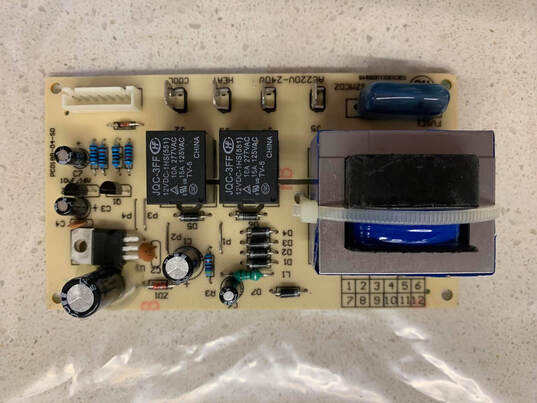
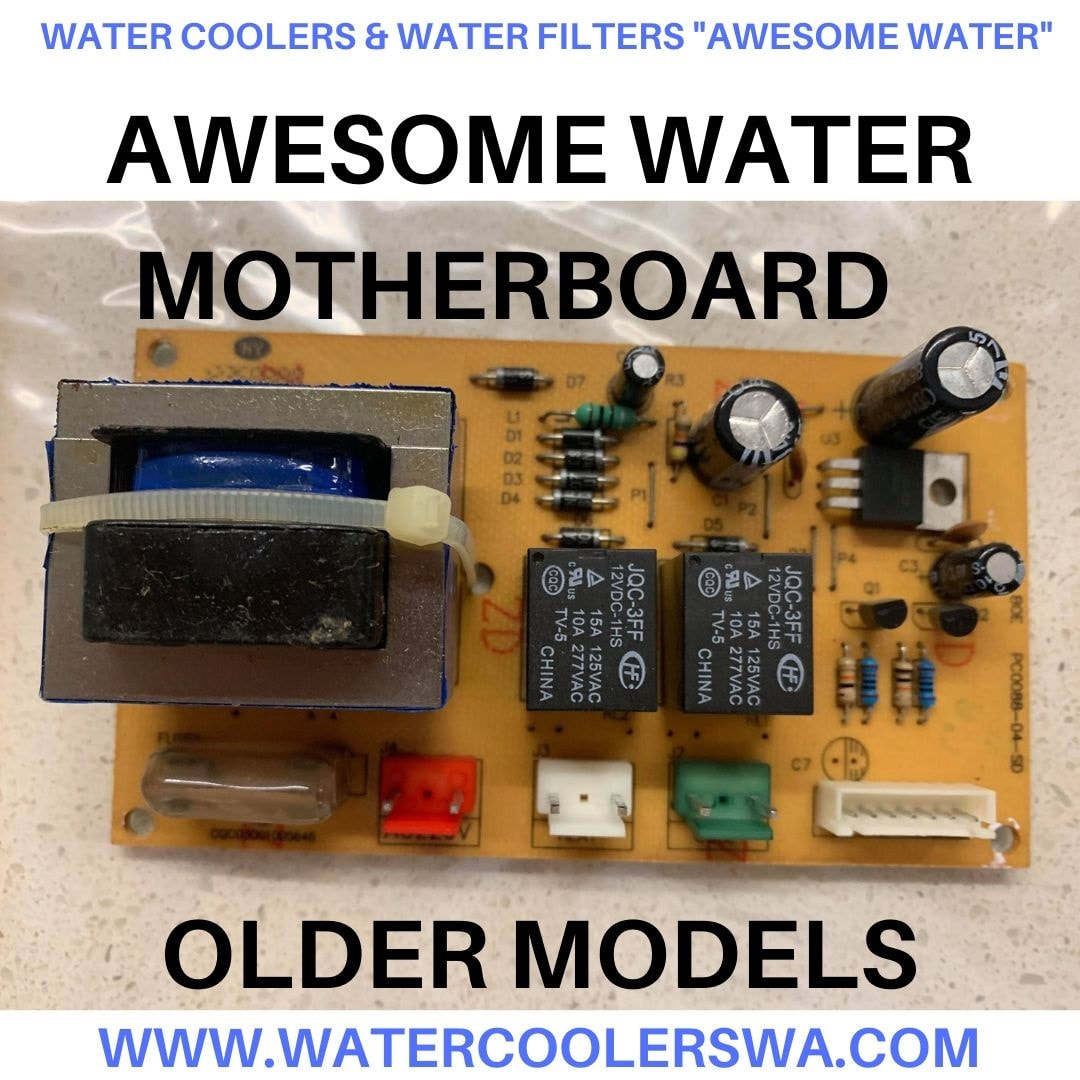
2. MOTHERBOARD
Check list
Check if damaged or signs that it has burnt out.
Remove bottle set of water cooler.
Unscrew 2 x screws located at the back of water cooler
Remove the lid, with a slight wiggle to loosen if needed
Remove Lid, ensuring wires stay in place
They is a metal box unscrew 2 x screws (back of machine)
IF no box earlier modules <2006 (rare parts)
Check for signs of damage on motherboard. (Black burns)
Check front and back.
IF burnt out or damage this needs to be replaced.
3. DIDGIBOARD
Check Didgiboard via the back of lid
For any signs of burnt out or damage
IF signs of damage to the Didgiboard needs replacing
Bench Top & Older Freestanding models (yellow and white plug) 2 pin
Newer Freestanding models with fridge (red, white, and yellow plugs) 3 pin temp control
HOT POT + ALK STICK
OPTIONAL EXTRA FILTERS (1 = $50) (2 = $80) (3 = $110) (4 = $130)
AWESOME WATER HOT POT
WATER COOLER “NOT HEATING”
PRICES VARY DUE TO ADDING EXTRA FILTERS
RECOMMENDED FILTER CHANGE EVERY 6 MONTHS
THE MORE YOU BUY THE MORE YOU SAVE FREE POSTAGE
POSSIBLE ISSUES:
1. Check to see if turned on (RED heat button)
2. Check your Hot temperature Settings (>92deg)
3. Motherboard could be burnt out
4. Kettle - hot pot temperature needs resetting
5. Kettle - hot pot element could have burned out
1. Check if turned ON
2. RED light triangle grids with hot flames
To turn on, push the Heat button once
Will only take 15 minutes to heats up.
3. Check your hot settings (>92 deg) max
CHECK MOTHERBOARD FOR ANY SIGNS OF DAMAGE
TURN POWER OFF BEFORE STARTING (BEST UNPLUGGED)
Unscrew 2 x screws located back of water cooler
Remove lid, wiggle to loosen
Remove Lid, making sure wires stay together
Unscrew metal box via 2 x screws at back of machine
IF NO box water cooler <2006 (rare parts)
Check signs of damage, burnt out via front, then check back for signs of damage too
Hot may be damaged but cold still ok.
IF Motherboard has signs of damage this needs to be replaced
OTHER ISSUES:
Check that the hot trip switch is NOT the cause of the problem
How to reset the hot trip switch
TURN POWER OFF & UNPLUG BEFORE STARTING
Removed lid
Remove 2 x screws at the front
Remove drip tray
Unscrew 2 x screws behind drip tray
Unhood the side panels.
Remove front face
Cut stay tie
Remove steel pipe to tap
Check and make sure power is turned off
Push the button, located near blue & black wires
Listen for a click when pushed.
This should now be reset.
IF not, issue is elsewhere
Place a stay tie on the metal pipe
Place rubber pipe onto metal pipe.
Tighten the stay tie
Close up water cooler in reverse order
Clip hooks back
Screws behind drip tray
Screws at front top
Screws at back top
FILL UP with water
DO NOT turn on until you have check to see if they if water flow from the HOT tap
OTHER ISSUE:
Kettle – Hot Pot has burnt out
If water is still not heating up, possible cause hot pot
element has burned out, if so this part needs replacing
MOTHER BOARD & COMPRESSOR + ALK STICK
OPTIONAL EXTRA FILTERS (1 = $50) (2 = $80) (3 = $110) (4 = $130)
WATER COOLER “NOT COOLING”
COULD BE 1 OFF 3 THINGS LISTED BELOW
1. COMPRESSOR SWITCH
2. MOTHERBOARD
3. DIDIBOARD
1. SEE HOW OLD YOUR MACHINE IS
On the back of your water coolers they is a grey sticker. The numbers are green the first 2 number are the year the water cooler was purchased
If older than 2006 – spare parts are rare...
Check list
Check if compressor kick’s in
Turn off your machine for more than 3 minutes, then turn back of with the cool snowflake BLUE button, listen for the compressor to kick in they will be a slight noise like a fridge turning on, can take up to 2-3 minutes your screen should have BLUE triangle grid with a small blue snowflake in the left corner of grid, just above the temperature display panel. You can also place your hand against the right side where the compressor is and you can feel compressor starting.
IF you do not hear a clicking noise the compressor clicking in, then this needs to be replaced
If digital display had faded due to sunlight you can use your hand to cup shade to see screen
1.COMPRESSOR SWITH
This is located at the back of the water cooler, behind the grilled bars. USE a torch to see easier.
2. MOTHERBOARD
Check list
Check if damaged or signs that it has burnt out.
Remove bottle set of water cooler.
Unscrew 2 x screws located at the back of water cooler
Remove the lid, with a slight wiggle to loosen if needed
Remove Lid, ensuring wires stay in place
They is a metal box unscrew 2 x screws (back of machine)
IF no box earlier modules <2006 (rare parts)
Check for signs of damage on motherboard. (Black burns)
Check front and back.
IF burnt out or damage this needs to be replaced.
3. DIDGIBOARD
Check Didgiboard via the back of lid
For any signs of burnt out or damage
IF signs of damage to the Didgiboard needs replacing
Bench Top & Older Freestanding models (yellow and white plug) 2 pin
Newer Freestanding models with fridge (red, white, and yellow plugs) 3 pin temp control
HOT POT EXTRAS + ALK STICK
OPTIONAL EXTRA FILTERS (1 = $50) (2 = $80) (3 = $110) (4 = $130)
1 X HOT POT -1 X ONE WAY VALUE - RETURN PIPE - BACK DRAIN PIPE.
POSSIBLE ISSUES:
1. Check to see if turned on (RED heat button)
2. Check your Hot temperature Settings (>92deg)
3. Motherboard could be burnt out
4. Kettle - hot pot temperature needs resetting
5. Kettle - hot pot element could have burned out
1. Check if turned ON
2. RED light triangle grids with hot flames
To turn on, push the Heat button once
Will only take 15 minutes to heats up.
3. Check your hot settings (>92 deg) max
CHECK MOTHERBOARD FOR ANY SIGNS OF DAMAGE
TURN POWER OFF BEFORE STARTING (BEST UNPLUGGED)
Unscrew 2 x screws located back of water cooler
Remove lid, wiggle to loosen
Remove Lid, making sure wires stay together
Unscrew metal box via 2 x screws at back of machine
IF NO box water cooler <2006 (rare parts)
Check signs of damage, burnt out via front, then check back for signs of damage too
Hot may be damaged but cold still ok.
IF Motherboard has signs of damage this needs to be replaced
OTHER ISSUES:
Check that the hot trip switch is NOT the cause of the problem
How to reset the hot trip switch
TURN POWER OFF & UNPLUG BEFORE STARTING
Removed lid
Remove 2 x screws at the front
Remove drip tray
Unscrew 2 x screws behind drip tray
Unhook the side panels.
Remove front face
Cut stay tie
Remove steel pipe to tap
Check and make sure power is turned off
Push the button, located near blue & black wires
Listen for a click when pushed.
This should now be reset.
IF not, issue is elsewhere
Place a stay tie on the metal pipe
Place rubber pipe onto metal pipe.
Tighten the stay tie
Close up water cooler in reverse order
Clip hooks back
Screws behind drip tray
Screws at front top
Screws at back top
FILL UP with water
DO NOT turn on until you have check to see if they if water flow from the HOT tap
OTHER ISSUE:
Kettle – Hot Pot has burnt out
If water is still not heating up, possible cause hot pot
element has burned out, if so this part needs replacing